Munis: Difference between revisions
mNo edit summary |
m (Protected "Munis" ([Edit=Allow only administrators] (indefinite) [Move=Allow only administrators] (indefinite))) |
||
| (2 intermediate revisions by the same user not shown) | |||
| Line 14: | Line 14: | ||
* You should be automatically signed in (green). Click the '''Tyler Menu''' (Red) ⇒ '''Human Resources/Payroll''' ⇒ '''Human Resources''' ⇒ '''Applicant Processing''' ⇒ '''Pending Applicants''' | * You should be automatically signed in (green). Click the '''Tyler Menu''' (Red) ⇒ '''Human Resources/Payroll''' ⇒ '''Human Resources''' ⇒ '''Applicant Processing''' ⇒ '''Pending Applicants''' | ||
[[File:Tylermenu.png|right|An example of the Tyle Menu Drilldown]] | |||
{| class="wikitable" border="1" style="border-collapse:collapse; width:300px; margin-left:65px;" | {| class="wikitable" border="1" style="border-collapse:collapse; width:300px; margin-left:65px;" | ||
| Line 20: | Line 22: | ||
| Right-click on '''Pending Applicants''', then choose '''Save to Favorites'''. It will then always be displayed for you at the left of the Tyler Dashboard Production screen | | Right-click on '''Pending Applicants''', then choose '''Save to Favorites'''. It will then always be displayed for you at the left of the Tyler Dashboard Production screen | ||
|} | |} | ||
---- | |||
=== Printing Attachments === | === Printing Attachments === | ||
The County stresses that users should not use the Print button in Munis. | <blockquote>The County stresses that users should not use the Print button in Munis. | ||
However, I have been successful printing from Microsoft Edge (which is the default program for opening html and pdf attachments) and Word (.doc attachments). | However, I have been successful printing from Microsoft Edge (which is the default program for opening html and pdf attachments) and Word (.doc attachments). | ||
To do this, I double-clicked the attachment in Munis, and Edge (or Word) opens the file. | To do this, I double-clicked the attachment in Munis, and Edge (or Word) opens the file. | ||
I then pressed Ctrl-P to get the print dialog. I changed the printer to one that I recognized (of course, be careful when printing sensitive documents…). I also ensured that the printer object name ended with my computer name, (from IT-SYSADMIN2) in this example. | I then pressed Ctrl-P to get the print dialog. I changed the printer to one that I recognized (of course, be careful when printing sensitive documents…). I also ensured that the printer object name ended with my computer name, (from IT-SYSADMIN2) in this example. | ||
</blockquote> | |||
[[File:Unonothingmontysnow.png|Here's how to print]] | [[File:Unonothingmontysnow.png|Here's how to print]] | ||
Latest revision as of 12:05, 31 March 2020
Hiring with Munis

- Log into Citrix Desktop as usual
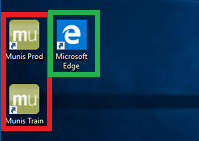
- The tan Munis icons (circled in red to the right) are deprecated. Use Microsoft Edge (circled in green).
- In MS Edge go to: https://munis.mc-gov.net/default.aspx
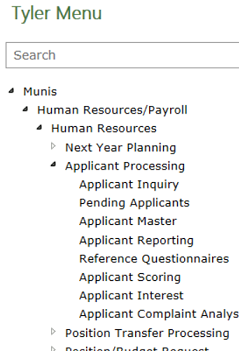
- You should be automatically signed in (green). Click the Tyler Menu (Red) ⇒ Human Resources/Payroll ⇒ Human Resources ⇒ Applicant Processing ⇒ Pending Applicants

| Hint |
|---|
| Right-click on Pending Applicants, then choose Save to Favorites. It will then always be displayed for you at the left of the Tyler Dashboard Production screen |
Printing Attachments
The County stresses that users should not use the Print button in Munis.
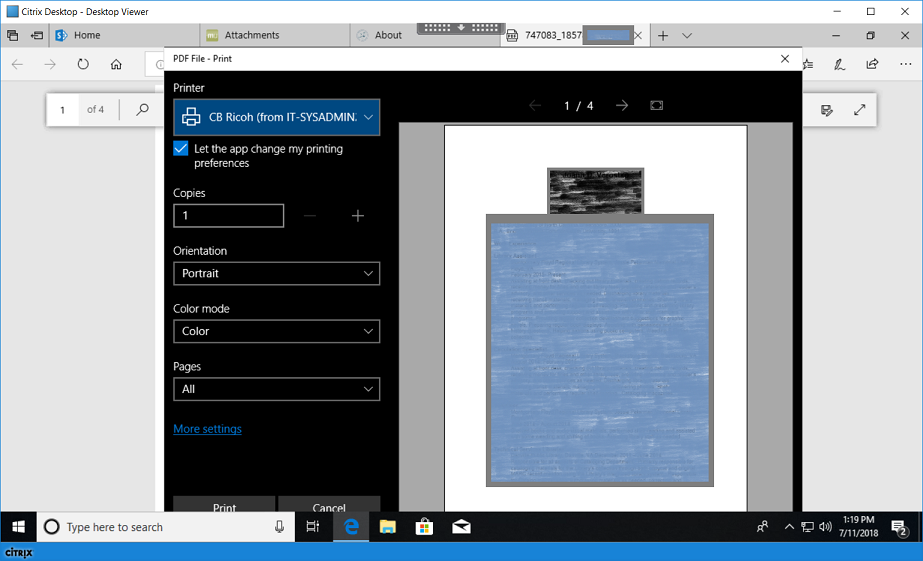
However, I have been successful printing from Microsoft Edge (which is the default program for opening html and pdf attachments) and Word (.doc attachments). To do this, I double-clicked the attachment in Munis, and Edge (or Word) opens the file. I then pressed Ctrl-P to get the print dialog. I changed the printer to one that I recognized (of course, be careful when printing sensitive documents…). I also ensured that the printer object name ended with my computer name, (from IT-SYSADMIN2) in this example.
Saving Attachments
Double-click the attachment in Munis. You should see What do you want to do with [this file] displayed at the bottom of the window. Choose Save As, using the arrow next to Save. A Save As dialog box opens. In the left pane, click This PC. Scroll Down and see Network Drive entries that end with your computer name. These entries are the drives that you see on your native computer. You will be able to save to these Network Drive locations and their subfolders. I recommend saving files to your H: drive (don’t use the P: drive).
Ending Session
When you are all finished shut down the Citrix Desktop “computer” by clicking (at the bottom left) Windows ⇒ Power button ⇒ Shut down.

