LibCal-SpaceBooking: Difference between revisions
(Created page with " ==How to Book a Space: ''Selecting an Available Time Slot'' method== *Click ''Spaces'' in main toolbar *Click ''Location'' (aka Branch) in main toolbar *Click ''Booking Grid...") |
(Rearranged flow to Step 1 > a / b > Step 2) |
||
| (3 intermediate revisions by the same user not shown) | |||
| Line 1: | Line 1: | ||
These are instructions for booking a space (room) in LibCal. | |||
==Step One: Selecting Desired Date / Time(s)== | |||
===Navigate to Availability Grid=== | |||
[[File:CreateSpaceRes.png|300px|thumb|right|Navigate to Availability Grid]] | |||
*Click ''Spaces'' in main toolbar | *Click ''Spaces'' in main toolbar | ||
*Click ''Location'' (aka Branch) in main toolbar | *Click ''Location'' (aka Branch) in main toolbar | ||
*Click ''Booking Grid & Availability'' | *Click ''Booking Grid & Availability'' | ||
*In ''Category'', select the room you would like to book, and then | *In ''Category'', select the room you would like to book, and then click ''Go''. | ||
After clicking ''Go'', the Availability Grid appears. | |||
=== | ===Option A: Select Date/Times by using the Availability Grid=== | ||
[[File:LibCalDatePicker.png|300px|thumb|right|Availability Grid]] | |||
[[File:LibCalStep1.png|300px|thumb|right|''Add Booking Step 1'' box]] | |||
Note: [[#Option_B:_Select_Date.2FTimes_by_using_the_Add_Booking_button|Option B]] is recommended for ''recurring bookings''. Single bookings can use either option. | |||
* | *In the Availability Grid, navigate to the date and time the patron wants to book the space. You can do this by: | ||
**sliding the horizontal scrollbar | **sliding the horizontal scrollbar | ||
**clicking the left/right navigational arrows | **clicking the left/right navigational arrows | ||
| Line 20: | Line 27: | ||
*Click the green box for the date / time desired | *Click the green box for the date / time desired | ||
**Blacksburg: be sure to click in the desired CR Room row as well. | **Blacksburg: be sure to click in the desired CR Room row as well. | ||
[[ | *The ''Add Booking Step 1'' box appears. | ||
**Adjust End Time if necessary. | |||
**Click ''Submit Times''. | |||
You are then shown the ''Add Booking Step 2'' screen. [[#Step_Two:_Enter_Patron_Information|Continue to Step 2.]] | |||
===Option B: Select Date/Times by using the ''Add Booking'' button=== | |||
[[File:LibCalAddBooking.png|300px|thumb|right|''Add Booking'' button]] | |||
Again, this is an alternate method of creating a booking. Also, it is the method to use when creating a recurring booking. | |||
*Click on the Add Booking button, above the Availability Grid, and select "Add Single Booking" or “Add Reoccurring Booking” from the dropdown menu. | |||
<div style="clear:both;"></div> | |||
====Single Booking==== | |||
[[File:LibCalCAddBookingButtonMethod.png|300px|thumb|right|''Add Booking Step 1'' box for single booking when using ''Add Booking'' button]] | |||
*In the Add Booking Step 1 window, select a Start Date and Start Time for the booking. | |||
*Select the space you want to book in the ''Space'' dropdown. | |||
**Note: If the space is unavailable / in use at the start time, the system will not let you select the Space. There's no real warning about this. | |||
*Once you've chosen the space, select an End Date. | |||
**Note: The system won't let you choose an End Date/Time that overlaps another booking. But, there is a message below the End Date box alerting of the next conflict time. | |||
*Click the ''Submit Times'' button. | |||
<div style="clear:both;"></div> | |||
====Recurring Booking==== | |||
[[File:LibCalCAddBookingRecurring.png|300px|thumb|right|''Add Booking Step 1'' box for Recurring Bookings]] | |||
[[File:LibCalConflict.png|300px|thumb|right|Conflict message]] | |||
[[File:LibCalNoConflict.png|300px|thumb|right|No conflicts message]] | |||
*In the Add Recurring Booking Step 1 window, select a Start Time and End Time for the booking. | |||
*Select a Repeat Pattern. | |||
**The form will grow and change depending upon your selection. Complete as necessary. | |||
*Add the desired space. | |||
*Click the ''Submit Times'' button. | |||
*The system will notify of any conflicts; see thumbnail. | |||
* | **If there are conflicts, you could: | ||
* | ***Click the red ''Submit Valid Times Only'' button to reserve all non-conflicting recurring bookings | ||
**Click '' | ***Edit the time / date parameters, and click ''Submit Times'' | ||
***Click ''Close'' to cancel | |||
*Alternately, the system will tell you if there are no conflicts. | |||
You are then shown the ''Add Booking Step 2'' screen. [[#Step_Two:_Enter_Patron_Information|Continue to Step 2.]] | |||
<div style="clear:both;"></div> | |||
==Step Two: Enter Patron Information== | |||
[[File:LibCalStep2.png|300px|thumb|right|''Add Booking Step 2'' box]] | |||
*Confirm the dates/times. | |||
*Enter group contact's Full Name, Email, and Group Name | |||
**<span style="color:#FF0000;">What if system event? what if holding a room (long prep)? Staff meeting? What if study room?</span> | |||
*If you are submitting the request on behalf of a patron: | |||
**Check the ''Send Confirmation Email to User'' checkbox. They will automatically receive an email when the room booking has been approved or denied. | |||
**'''Select the Optional drop down''' to complete meeting information. (See red box on image) | |||
*Optionally, you can add an Internal Note to log any helpful info about this booking. | |||
*Click the ''Add Booking'' button | |||
The ''Add Booking Step 3'' box appears. This is simply a Success message. | |||
<span style="color:#FF0000;"> | |||
Note that this is a submitted request, and that the Mediated Tentative is the status. The booking needs to be approved by a supervisor or other appointed person. They will be notified by email....Click elsewhere to learn how to see if a booking has been approved, booking explorer, etc..... also add page 3 of P:\Projects\Comm Infrastructure\LibCal Instructions\LibCal Instructions _ How to Book a Room for Staff.docx | |||
</span> | |||
Latest revision as of 11:26, 26 August 2021
These are instructions for booking a space (room) in LibCal.
Step One: Selecting Desired Date / Time(s)

- Click Spaces in main toolbar
- Click Location (aka Branch) in main toolbar
- Click Booking Grid & Availability
- In Category, select the room you would like to book, and then click Go.
After clicking Go, the Availability Grid appears.
Option A: Select Date/Times by using the Availability Grid

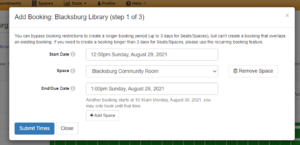
Note: Option B is recommended for recurring bookings. Single bookings can use either option.
- In the Availability Grid, navigate to the date and time the patron wants to book the space. You can do this by:
- sliding the horizontal scrollbar
- clicking the left/right navigational arrows
- using the Go To Date widget
- Click the green box for the date / time desired
- Blacksburg: be sure to click in the desired CR Room row as well.
- The Add Booking Step 1 box appears.
- Adjust End Time if necessary.
- Click Submit Times.
You are then shown the Add Booking Step 2 screen. Continue to Step 2.
Option B: Select Date/Times by using the Add Booking button
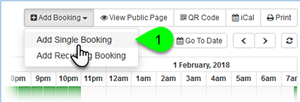
Again, this is an alternate method of creating a booking. Also, it is the method to use when creating a recurring booking.
- Click on the Add Booking button, above the Availability Grid, and select "Add Single Booking" or “Add Reoccurring Booking” from the dropdown menu.
Single Booking
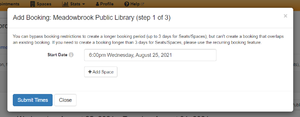
- In the Add Booking Step 1 window, select a Start Date and Start Time for the booking.
- Select the space you want to book in the Space dropdown.
- Note: If the space is unavailable / in use at the start time, the system will not let you select the Space. There's no real warning about this.
- Once you've chosen the space, select an End Date.
- Note: The system won't let you choose an End Date/Time that overlaps another booking. But, there is a message below the End Date box alerting of the next conflict time.
- Click the Submit Times button.
Recurring Booking
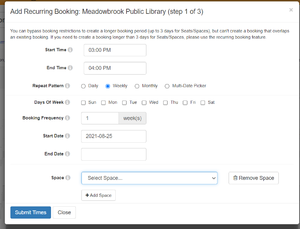

- In the Add Recurring Booking Step 1 window, select a Start Time and End Time for the booking.
- Select a Repeat Pattern.
- The form will grow and change depending upon your selection. Complete as necessary.
- Add the desired space.
- Click the Submit Times button.
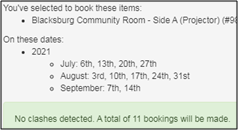
- The system will notify of any conflicts; see thumbnail.
- If there are conflicts, you could:
- Click the red Submit Valid Times Only button to reserve all non-conflicting recurring bookings
- Edit the time / date parameters, and click Submit Times
- Click Close to cancel
- If there are conflicts, you could:
- Alternately, the system will tell you if there are no conflicts.
You are then shown the Add Booking Step 2 screen. Continue to Step 2.
Step Two: Enter Patron Information
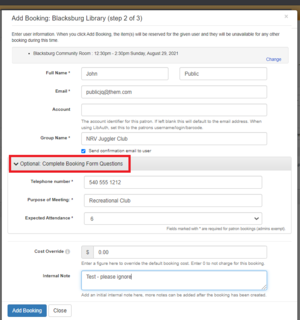
- Confirm the dates/times.
- Enter group contact's Full Name, Email, and Group Name
- What if system event? what if holding a room (long prep)? Staff meeting? What if study room?
- If you are submitting the request on behalf of a patron:
- Check the Send Confirmation Email to User checkbox. They will automatically receive an email when the room booking has been approved or denied.
- Select the Optional drop down to complete meeting information. (See red box on image)
- Optionally, you can add an Internal Note to log any helpful info about this booking.
- Click the Add Booking button
The Add Booking Step 3 box appears. This is simply a Success message.
Note that this is a submitted request, and that the Mediated Tentative is the status. The booking needs to be approved by a supervisor or other appointed person. They will be notified by email....Click elsewhere to learn how to see if a booking has been approved, booking explorer, etc..... also add page 3 of P:\Projects\Comm Infrastructure\LibCal Instructions\LibCal Instructions _ How to Book a Room for Staff.docx