Citrix for Hiring: Difference between revisions
m (Protected "Citrix for Hiring" ([Edit=Allow only administrators] (indefinite) [Move=Allow only administrators] (indefinite)) [cascading]) |
No edit summary |
||
| (5 intermediate revisions by the same user not shown) | |||
| Line 2: | Line 2: | ||
==First use set-up and general notes== | ==First use set-up and general notes== | ||
Look at your "system tray", as show below. Do you have the Citix icon, shown in red square? If not, contact Chris. | Look at your "system tray", as show below. Do you have the Citix icon (could be a different color), shown in red square? If not, contact Chris. If you ever see the ''Add Account'' pop-up, please leave it blank - just click "close". If there is a "don't ask again" checkbox, check it. | ||
[[File:Citrix Icon.png|left]] [[File:Citrix Add Account.png]] | |||
<div style="clear: both"> | |||
==Connecting to the County - Citrix Workspace== | |||
Navigate your web browser to https://myapps2.montgomerycountyva.gov/ and Log in with your credentials. User names are usually ''lastnamefm'' format. | |||
Click the ''Detect Citrix Workspace App'' button. | |||
[[File:Citrix_Detect_Receiver.png]] | |||
Depending on your settings and prior use, you may see: | |||
[[File:CitrixLauncherWithDetect.png|500px]] | |||
Click the "Open" button (you can check the "Always Allow" if you wish). This should open the Storefront. | |||
[[File: | Click on ''Desktops'' at the top. You probably only have one Citrix Desktop. Click to open (Allow Workspace Launcher, again, if prompted). | ||
[[File:CitrixStorefront.png|500px]] | |||
| Line 30: | Line 33: | ||
The Citrix Desktop window will open, often full-screen, that looks like a virtual computer. | The Citrix Desktop window will open, often full-screen, that looks like a virtual computer. | ||
[[File:Citrix_Desktop.png | [[File:Citrix_Desktop.png]] | ||
If the full screen view is confusing or annoying, you can click the tab at the top center of the screen and tell the Receiver program to display as a window. | If the full screen view is confusing or annoying, you can click the tab at the top center of the screen and tell the Receiver program to display as a window. | ||
==Using Munis and the Citrix Desktop== | |||
The Citrix Desktop computer will act like a brand new computer every time you use it. It will ask lots of (what are usually) one-time, first-run questions. Do not sign into anything. Do not sync with anything. Answer all prompts as non-invasively as possible. Close windows when you can. | |||
' | When you can see the desktop of the Citrix Computer, double-click TylerHub. Edge first-run prompts will appear; again, don't log into anything during these prompts. Eventually, an Okta login will appear. Use your credentials to sign in (same lastnamefm credentials that you used earlier). You will now be in the Hiring hub. | ||
''This is not a Munis tutorial. The intent of this section is to demonstrate connecting to Munis.'' | |||
To look at candidates for a posted position, you will want to click on the menu icon (in red box), then ''Pending Applicants''. (Or, quicker, just click the "popout" icon on the ''Applicant Status'' tile.) | |||
[[File:TylerMenu.png|400px|left]] [[File:CitrixAppStat.png]] | |||
<div style="clear: both"> | |||
==Printing / Saving Info== | ==Printing / Saving Info== | ||
It is highly recommended to '''not''' print directly from the Citrix Desktop. Instead, save items to your local computer and print from there as you normally would. | |||
In this screenshot, I'm attempting to save a PDF. In the left side of the Save As box, click the This PC icon. Your computer will display an Access warning; choose "allow read/write access". | |||
[[File: | [[File:CitrixAllowAccess.png|600px]]+ | ||
Choosing Allow will permit the Citrix Desktop computer to display the contents of This PC. Select your H drive (shown as Network Drive H: on <your computer name>), and save Applicants' documents there. References to Desktop and C: refer to the Citrix Desktop computer's locations, not your local computer's locations, so don't save in those locations. | |||
Saving each applicant's documents in their own folder will help with organization. | |||
[[File: | [[File:Citrix SaveAs.png|600px]] | ||
Latest revision as of 08:40, 2 October 2024
First use set-up and general notes
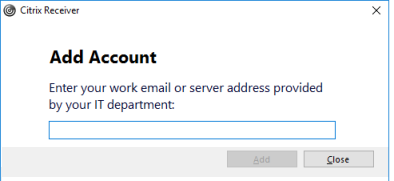
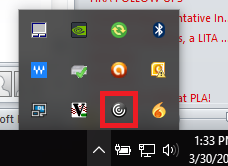
Look at your "system tray", as show below. Do you have the Citix icon (could be a different color), shown in red square? If not, contact Chris. If you ever see the Add Account pop-up, please leave it blank - just click "close". If there is a "don't ask again" checkbox, check it.
Connecting to the County - Citrix Workspace
Navigate your web browser to https://myapps2.montgomerycountyva.gov/ and Log in with your credentials. User names are usually lastnamefm format.
Click the Detect Citrix Workspace App button.
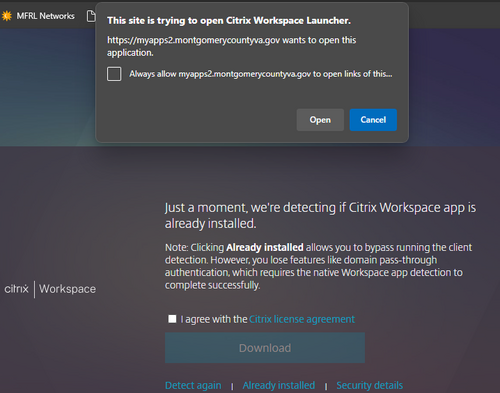
Depending on your settings and prior use, you may see:
Click the "Open" button (you can check the "Always Allow" if you wish). This should open the Storefront.
Click on Desktops at the top. You probably only have one Citrix Desktop. Click to open (Allow Workspace Launcher, again, if prompted).
The full Citrix interface does take many seconds before it opens. Be patient. I've also seen it open "underneath" another window, should you not notice it start.
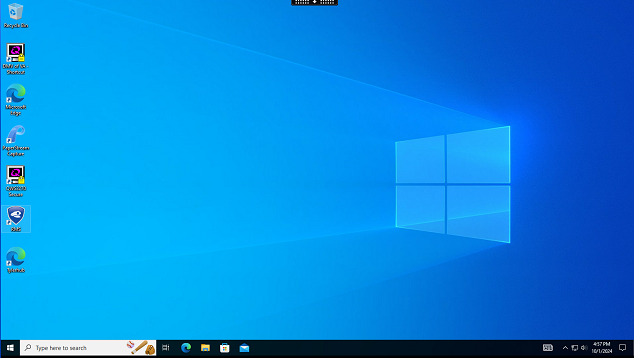
The Citrix Desktop window will open, often full-screen, that looks like a virtual computer.
If the full screen view is confusing or annoying, you can click the tab at the top center of the screen and tell the Receiver program to display as a window.
Using Munis and the Citrix Desktop
The Citrix Desktop computer will act like a brand new computer every time you use it. It will ask lots of (what are usually) one-time, first-run questions. Do not sign into anything. Do not sync with anything. Answer all prompts as non-invasively as possible. Close windows when you can.
When you can see the desktop of the Citrix Computer, double-click TylerHub. Edge first-run prompts will appear; again, don't log into anything during these prompts. Eventually, an Okta login will appear. Use your credentials to sign in (same lastnamefm credentials that you used earlier). You will now be in the Hiring hub.
This is not a Munis tutorial. The intent of this section is to demonstrate connecting to Munis.
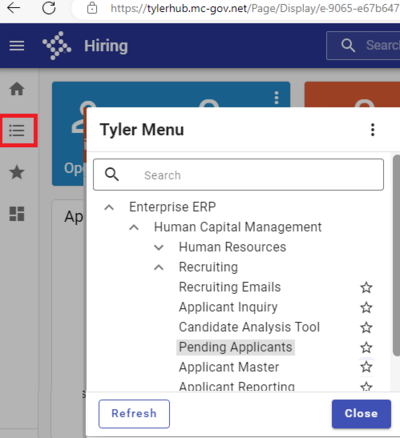
To look at candidates for a posted position, you will want to click on the menu icon (in red box), then Pending Applicants. (Or, quicker, just click the "popout" icon on the Applicant Status tile.)

Printing / Saving Info
It is highly recommended to not print directly from the Citrix Desktop. Instead, save items to your local computer and print from there as you normally would.
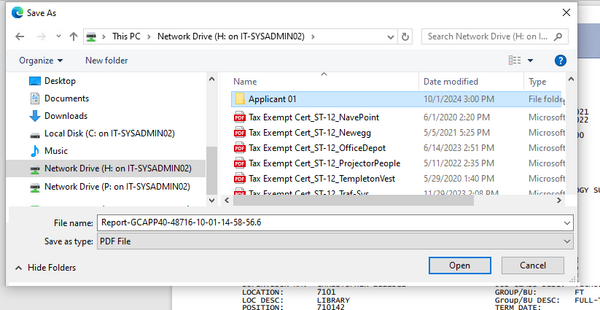
In this screenshot, I'm attempting to save a PDF. In the left side of the Save As box, click the This PC icon. Your computer will display an Access warning; choose "allow read/write access".
Choosing Allow will permit the Citrix Desktop computer to display the contents of This PC. Select your H drive (shown as Network Drive H: on <your computer name>), and save Applicants' documents there. References to Desktop and C: refer to the Citrix Desktop computer's locations, not your local computer's locations, so don't save in those locations.
Saving each applicant's documents in their own folder will help with organization.
