LibCal-SpaceBooking: Difference between revisions
No edit summary |
(most images turned into thumbs) |
||
| Line 21: | Line 21: | ||
[[File:LibCalCAddBookingButtonMethod.png|frameless|upright=2.2]] | [[File:LibCalCAddBookingButtonMethod.png|frameless|upright=2.2]] | ||
[[File:LibCalCAddBookingRecurring.png|frameless|upright=2.2]] | [[File:LibCalCAddBookingRecurring.png|frameless|upright=2.2]] | ||
ABOVE HERE ARE "DRAFT NOTES" AND UNUSED IMAGES | |||
==How to Book a Space: ''Selecting an Available Time Slot'' method== | ==How to Book a Space: ''Selecting an Available Time Slot'' method== | ||
[[File:CreateSpaceRes.png|300px|thumb|right|Navigate to Availability Grid]] | |||
*Click ''Spaces'' in main toolbar | *Click ''Spaces'' in main toolbar | ||
*Click ''Location'' (aka Branch) in main toolbar | *Click ''Location'' (aka Branch) in main toolbar | ||
| Line 29: | Line 31: | ||
*In ''Category'', select the room you would like to book, and then click ''Go''. | *In ''Category'', select the room you would like to book, and then click ''Go''. | ||
<!-- | |||
[[File:CreateSpaceRes.png|frameless|upright=2.2]] | [[File:CreateSpaceRes.png|frameless|upright=2.2]] | ||
--> | |||
After clicking ''Go'', the Availability Grid appears. | |||
===This method involves clicking on an available time slot in the Availability Grid.=== | |||
[[File:LibCalDatePicker.png|300px|thumb|right|Availability Grid]] | |||
===This method involves clicking on an available time slot in the | [[File:LibCalStep1.png|300px|thumb|right|''Add Booking Step 1'' box]] | ||
[[File:LibCalStep2.png|300px|thumb|right|''Add Booking Step 2'' box]] | |||
Use <span style="color:#FF0000;">other method</span> if a ''recurring booking'' is desired. | Use <span style="color:#FF0000;">other method</span> if a ''recurring booking'' is desired. | ||
* | *In the Availability Grid, navigate to the date and time the patron wants to book the space. You can do this by: | ||
**sliding the horizontal scrollbar | **sliding the horizontal scrollbar | ||
**clicking the left/right navigational arrows | **clicking the left/right navigational arrows | ||
| Line 46: | Line 51: | ||
**Blacksburg: be sure to click in the desired CR Room row as well. | **Blacksburg: be sure to click in the desired CR Room row as well. | ||
<!-- | |||
[[File:LibCalDatePicker.png|frameless|upright=2.2]] | [[File:LibCalDatePicker.png|frameless|upright=2.2]] | ||
--> | |||
*The ''Add Booking Step 1'' box appears. | |||
*The ''Add Booking Step 1'' box appears. | |||
**Adjust End Time if necessary. | **Adjust End Time if necessary. | ||
**Click ''Submit Times''. | **Click ''Submit Times''. | ||
<!-- | |||
[[File:LibCalStep1.png|frameless|upright=2.2]] | [[File:LibCalStep1.png|frameless|upright=2.2]] | ||
--> | |||
*The ''Add Booking Step 2'' box appears. | |||
*The ''Add Booking Step 2'' box appears. | |||
**Confirm the dates/times. | **Confirm the dates/times. | ||
**Enter group contact's Full Name, Email, and Group Name | **Enter group contact's Full Name, Email, and Group Name | ||
| Line 69: | Line 73: | ||
**Optionally, you can add an Internal Note to log any helpful info about this booking. | **Optionally, you can add an Internal Note to log any helpful info about this booking. | ||
**Click the ''Add Booking'' button | **Click the ''Add Booking'' button | ||
<div style="clear:both;"></div> | |||
<!-- | |||
[[File:LibCalStep2.png|frameless|upright=2.2]] | [[File:LibCalStep2.png|frameless|upright=2.2]] | ||
--> | |||
===Adding a booking using the ''Add Booking'' button=== | ===Adding a booking using the ''Add Booking'' button=== | ||
| Line 79: | Line 83: | ||
*Click on the Add Booking button, above the | *Click on the Add Booking button, above the Availability Grid, and select "Add Single Booking" or “Add Reoccurring Booking” from the dropdown menu. | ||
[[File:LibCalAddBooking.png|frameless|upright=2.2]] | [[File:LibCalAddBooking.png|frameless|upright=2.2]] | ||
| Line 93: | Line 96: | ||
====Recurring Booking==== | ====Recurring Booking==== | ||
[[File:LibCalConflict.png|300px|thumb|right|Conflict message]] | |||
[[File:LibCalNoConflict.png|300px|thumb|right|No conflicts message]] | |||
*In the Add Recurring Booking Step 1 window, select a Start Time and End Time for the booking. | *In the Add Recurring Booking Step 1 window, select a Start Time and End Time for the booking. | ||
*Select a Repeat Pattern. | *Select a Repeat Pattern. | ||
| Line 98: | Line 104: | ||
*Add the desired space. | *Add the desired space. | ||
*Click the ''Submit Times'' button. | *Click the ''Submit Times'' button. | ||
*The system will notify of any conflicts | *The system will notify of any conflicts; see thumbnail. | ||
<!-- | |||
[[File:LibCalConflict.png|frameless|upright=2.2]] | [[File:LibCalConflict.png|frameless|upright=2.2]] | ||
--> | |||
* | **If there are conflicts, you could: | ||
**Click the red ''Submit Valid Times Only'' button to reserve all non-conflicting recurring bookings | ***Click the red ''Submit Valid Times Only'' button to reserve all non-conflicting recurring bookings | ||
**Edit the time / date parameters, and click ''Submit Times'' | ***Edit the time / date parameters, and click ''Submit Times'' | ||
**Click ''Close'' to cancel | ***Click ''Close'' to cancel | ||
*Alternately, the system will tell you if there are no conflicts. | |||
Alternately, the system will tell you if there are no conflicts. | <!-- | ||
[[File:LibCalNoConflict.png|frameless|upright=2.2]] | [[File:LibCalNoConflict.png|frameless|upright=2.2]] | ||
--> | |||
You are then shown the ''Add Booking Step 2'' screen. | You are then shown the ''Add Booking Step 2'' screen. | ||
Revision as of 10:27, 26 August 2021
Navigate
Select Time Method 1
Select Time Method 2 / recurring
Complete Form (Patron Info)
add at end:
- The Add Booking Step 3 box appears.
- This is simply a Success message.
Note that this is a submitted request, and that the Mediated Tentative is the status. The booking needs to be approved by a supervisor or other appointed person. They will be notified by email.
then also add page 3 of P:\Projects\Comm Infrastructure\LibCal Instructions\LibCal Instructions _ How to Book a Room for Staff.docx
unused so far:
ABOVE HERE ARE "DRAFT NOTES" AND UNUSED IMAGES
How to Book a Space: Selecting an Available Time Slot method

- Click Spaces in main toolbar
- Click Location (aka Branch) in main toolbar
- Click Booking Grid & Availability
- In Category, select the room you would like to book, and then click Go.
After clicking Go, the Availability Grid appears.
This method involves clicking on an available time slot in the Availability Grid.

Use other method if a recurring booking is desired.
- In the Availability Grid, navigate to the date and time the patron wants to book the space. You can do this by:
- sliding the horizontal scrollbar
- clicking the left/right navigational arrows
- using the Go To Date widget
- Click the green box for the date / time desired
- Blacksburg: be sure to click in the desired CR Room row as well.
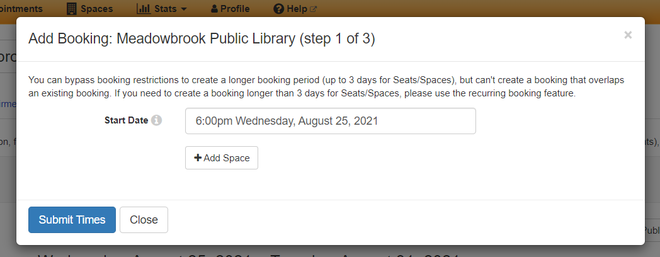
- The Add Booking Step 1 box appears.
- Adjust End Time if necessary.
- Click Submit Times.
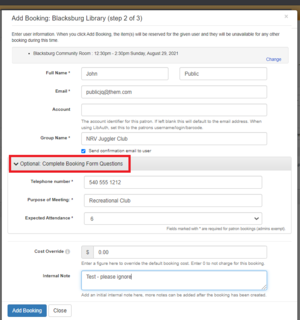
- The Add Booking Step 2 box appears.
- Confirm the dates/times.
- Enter group contact's Full Name, Email, and Group Name
- What if system event? what if holding a room (long prep)? Staff meeting? What if study room?
- If you are submitting the request on behalf of a patron:
- Check the Send Confirmation Email to User checkbox. They will automatically receive an email when the room booking has been approved or denied.
- Always select the Optional drop down to complete meeting information. (See red box)
- Optionally, you can add an Internal Note to log any helpful info about this booking.
- Click the Add Booking button
Adding a booking using the Add Booking button
Again, this is an alternate method of creating a booking. Also, it is the method to use when creating a recurring booking.
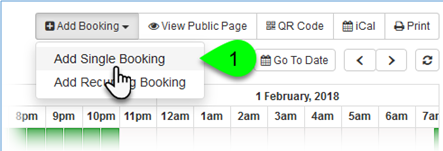
- Click on the Add Booking button, above the Availability Grid, and select "Add Single Booking" or “Add Reoccurring Booking” from the dropdown menu.
Single Booking
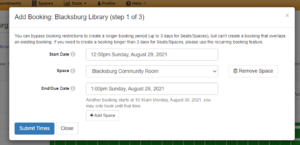
- In the Add Booking Step 1 window, select a Start Date and Start Time for the booking.
- Select the space you want to book in the Space dropdown.
- Note: If the space is unavailable / in use at the start time, the system will not let you select the Space. There's no real warning about this.
- Once you've chosen the space, select an End Date.
- Note: The system won't let you choose an End Date/Time that overlaps another booking. But, there is a message below the End Date box alerting of the next conflict time.
- Click the Submit Times button.
Recurring Booking

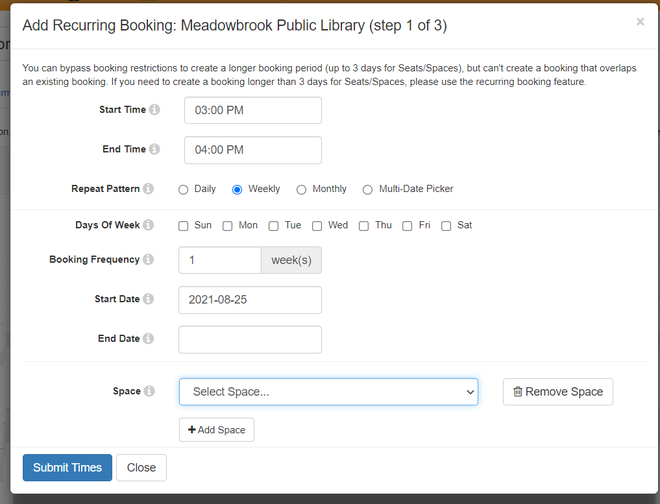
- In the Add Recurring Booking Step 1 window, select a Start Time and End Time for the booking.
- Select a Repeat Pattern.
- The form will grow and change depending upon your selection. Complete as necessary.
- Add the desired space.
- Click the Submit Times button.
- The system will notify of any conflicts; see thumbnail.
- If there are conflicts, you could:
- Click the red Submit Valid Times Only button to reserve all non-conflicting recurring bookings
- Edit the time / date parameters, and click Submit Times
- Click Close to cancel
- If there are conflicts, you could:
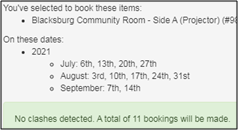
- Alternately, the system will tell you if there are no conflicts.
You are then shown the Add Booking Step 2 screen.
