Acting on tickets
When a ticket notification email arrives, staff can click a link in the email to go to the ticket. Or, they can go to the Staff Control Panel. Note that the system is not accessible from outside the buildings.
Floating Toolbar
Using the floating toolbar, shown in single ticket viewer, is recommended for most actions. Buttons are labeled with Tooltips that are visible upon mousehover.
1. Assignment to agents / Claim the ticket
Claim the ticket If the ticket goes to the Level I team, a member should Claim it from the Assign (sometimes labeled Reassign) button on the ticket toolbar. The system will assign non-Level I team tickets to the appropriate agent automatically; no need to Claim.
Not your ticket? If the ticket should be handled by someone else, any member can reassign the ticket through the Assign button. It’s best to put a note in the Assign to Agent dialog box, like “this is really a youth item”. It's possible to assign the ticket to an agent or to the Level I team. The new assignee will get a notification email.
Need to escalate / de-escalate ticket?: If an agent needs clarification or guidance from a superior, they can reassign the ticket as above, and ask a question in the comments section of the interface. Likewise, a superior can answer a question in the Internal Notes and re-assign the ticket back to the original Agent.
2. Edit the ticket
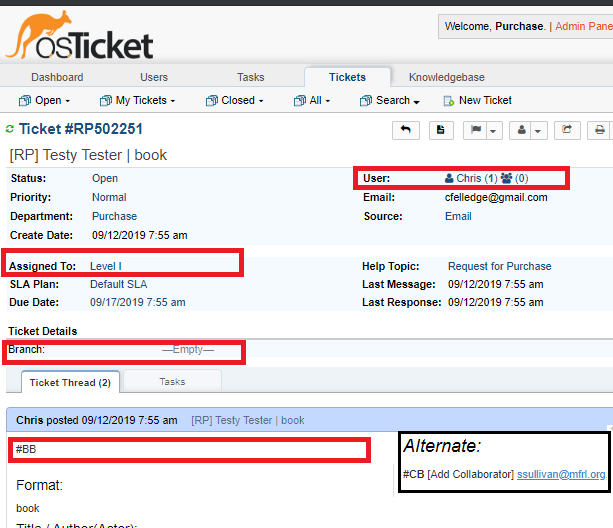
Indicate Branch In the Ticket Details at top of the ticket, click the word Empty next to Branch. Select correct branch. This data is needed to auto-populate fields in the Canned Responses. It will also help facilitate searches and stats for tickets.
Also displayed on the screenshot above:
User - information - The patron’s name is at the right of the details, followed by a number in parenthesis. This indicates the total number of tickets that this patron has submitted. User name is permanently tied to an email address. The second set of parenthesis shows if any collaborators have been assigned to this ticket. No need to edit this info.
3. Reply to Ticket
Post Reply vs. Internal Note information
Be aware that Post Reply entries will be sent via email to the patron. Internal Notes do not. Do not confuse these two! I recommend getting into the habit of using the Reply / Internal Notes buttons from the floating toolbar.
You can use Post Reply to ask follow-up, "Did you mean..." questions of the patron. The system will generate an email and send it to the patron. When the patron replies to the email, their response will be inserted into the ticket, and the agent will be notified.
Internal Notes are just that. Use at will. Notes are captured within the ticket, and the Assigned Agent will get an email notification.
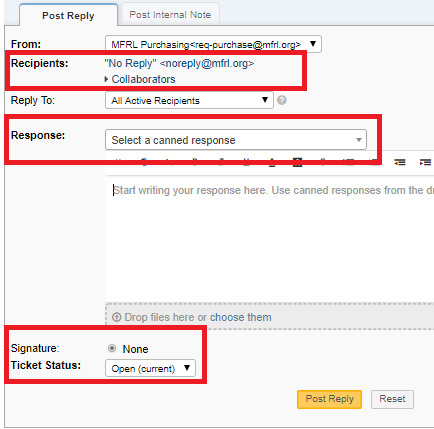
Recipients For "contact via phone" patrons, you may notice that the Ticket Owner is noreply@mfrl.org; this is OK.
Add Collaborator Click on the word “Collaborator” in the Recipients section of Post Reply. Add the Branch Manager’s email address. Since the branches don't have access to the ticket system, and are responsible for contacting "Phone patrons", you need to add the Branch Manager in those situations. Adding a collaborator will "BCC:" the branch manager.
For good inter-branch communications, KK requests that branch managers be collaborators on all tickets (unless the patron is a staff member).
Response In most cases, Canned Responses would be recommended. Canned Responses import editable text into the Response at the current location of the cursor. One or more Canned Responses can be "stacked" on top of each other.
If the patron is Phone Reply, I recommend starting with Branch Calls Patron response as a preamble, to visually cue to the branch manager that they'll need to make a call.
Choose Purchase Granted or Purchase Denied canned response, with text edited as needed. The original message is automatically appended to the end of these responses. There are other optional responses in specific situations.
Change the Ticket Status dropdown from Open to Closed, if applicable.
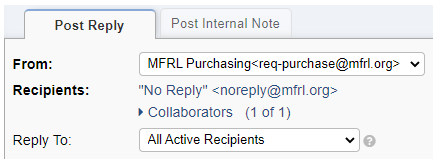
Verify Collaborators and recipients.
Make sure the Collaborator lists 1 of 1 members. Respond to All Active Recipients.
Click Post Reply. The system will send the reply as an email to the patron and BCC any collaborators.
4. Verify again Collaborators and recipients.
The sent-to icon should look like a group of people, as shown in red box below. This indicates a notification went to a group of people, which is (usually) desired. If the icon is a single person head, then only one person was sent a notification. (20221102 CFE/IT has recently noticed a notification issue, hence the two "Verify" steps.)


