DexProcessing: Difference between revisions
Jump to navigation
Jump to search
No edit summary |
(Dex interface changed.) |
||
| (2 intermediate revisions by the same user not shown) | |||
| Line 14: | Line 14: | ||
[[file:process3.png]] | [[file:process3.png]] | ||
Our transactions will always be Debit/Sale. | |||
*Enter the following information | *Enter the following information | ||
** | **Subtotal (1) which is the amount to charge. We never add Tax | ||
**Consumer Order ID (2). This is where payment reason ("fax") or User ID is entered. | |||
[[file:process4.png|500px]] | [[file:process4.png|500px]] | ||
*Insert the card into card reader with card and front of reader facing you. Click Add Transaction ( | You will likely need to scroll down to see the remainder of the screen. | ||
**If the card will not read being inserted, select Swipe | |||
*Insert the card into card reader with card and front of reader facing you. Click Add Transaction (3) after information populates. | |||
**If the card will not read being inserted, select Swipe, then try the swiping the card | |||
**Do not enter the CVV or zip/postal code | **Do not enter the CVV or zip/postal code | ||
**NEVER MANUALLY ENTER CREDIT CARD INFORMATION | **NEVER MANUALLY ENTER CREDIT CARD INFORMATION | ||
<BR> | |||
* | *Below is the payment confirmed screen. To print a receipt, choose ''Print Standard Receipt'' (only). | ||
*When finished, hit Done and return card to patron | *When finished, hit Done and return card to patron | ||
[[file:process8.png| | [[file:process8.png|350px]] | ||
Latest revision as of 15:27, 5 January 2024
To Process a Credit Card Transaction
- Click “Dex” shortcut on desktop
- Log In
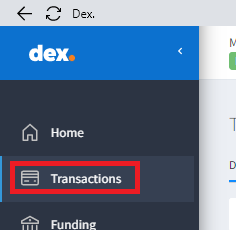
- Click Transactions in left column
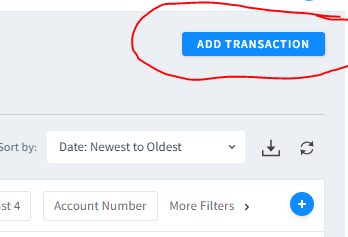
- Click Add Transaction at top right
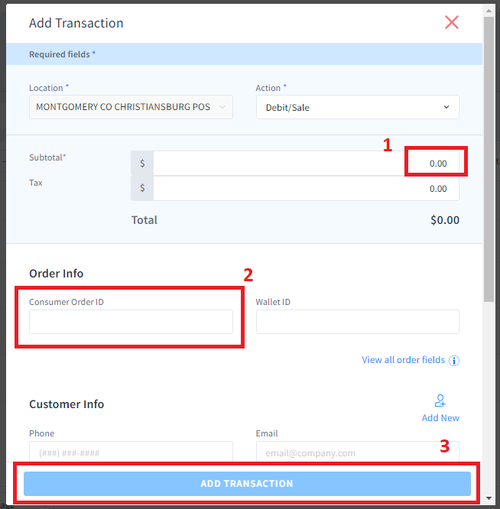
Our transactions will always be Debit/Sale.
- Enter the following information
- Subtotal (1) which is the amount to charge. We never add Tax
- Consumer Order ID (2). This is where payment reason ("fax") or User ID is entered.
You will likely need to scroll down to see the remainder of the screen.
- Insert the card into card reader with card and front of reader facing you. Click Add Transaction (3) after information populates.
- If the card will not read being inserted, select Swipe, then try the swiping the card
- Do not enter the CVV or zip/postal code
- NEVER MANUALLY ENTER CREDIT CARD INFORMATION
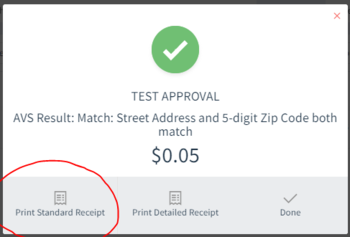
- Below is the payment confirmed screen. To print a receipt, choose Print Standard Receipt (only).
- When finished, hit Done and return card to patron


